
This will come as no surprise to regular readers of this blog, I’m somewhat of a nerd. Not your run of the mill duct-taped glasses, pocket protector, plaid shorts wearing super computer nerd, no I’m a map nerd. I’ve always had a fascination with maps. I don’t really know why. When other kids were drawing airplanes, spaceships, or castles, I was drawing maps. Maybe it’s the thought that a few lines on a piece of paper (or even better parchment, which I tried to create by holding my maps over a burning candle to give them a brown-aged look) can evoke the mysteries of fantastic far off places. I can even say that maps played an important role in my love of fantasy novels. While I was certainly interested in reading about the quest to defeat Smaug, the maps in the book and the critical role played by a secret map were key hooks for my curiosity in The Hobbit.
 To this day maps are one of my criteria when selecting a new fantasy story to read. To be sure the artwork and back cover blurb are important, but I always search the front and back pages for maps as well as other fantasy staples such as lists of characters, foreign language translations, etc. I’m clearly not alone. Authors and publishers have noticed and most fantasy books include some or all of these fantasy story extras. One of my favorite series, The Belgariad by David Eddings, even included maps in the cover artwork. My debut series, Misaligned, which mixes Celtic mythology with String Theory in a small upstate New York town (Misaligned Series Info), didn’t lend itself to a map, but I did include a complete list of translations for all the Welsh I used.
With my daughter’s encouragement (perhaps too light a word), I’ve written a second series (Warders Info) that fits more solidly in the fantasy genre. It combines the adventure and intrigue of a James Bond-like conflict with the setting of a traditional high fantasy world. There’s an evil order bent on spreading chaos in the world (irony intended), which is opposed by a secret organization. Elves, dwarves, mages and sorcerers fill the roles of secret agents, assassins, and archenemies, while magic replaces technology in providing cool gadgets for both sides. As much as I enjoyed creating the story, I really looked forward to creating the map.
Initially, I drew the map by hand. This helped me visualize the relationships between the places in the story and in some cases modify them as the story evolved, but it wasn’t suitable for a published book. I decided to try and make a digital map. It took me less than an hour to figure out that using clip art and Powerpoint wasn’t the answer. I took to the internet and found several useful references (see links below). Most of them used Photoshop, which I’d heard of, but a few used GIMP (the GNU Image Manipulation Program). Sample maps created with both programs looked really great, so my decision came down to cost. As freeware GIMP cost nothing, so being the ever-broke writer I went with GIMP.
The whole digital creation process from my initial search to final jpeg product took just over two weeks to complete. Somewhere along the way I converted the colors to greyscale – to see what it would look like in paperback – and lost the color image. I never figured out how to get the color back, but I’m happy with the non-color version. The final result’s not quite as packed or pretty as a Tolkein map, but I’m rather pleased with it.
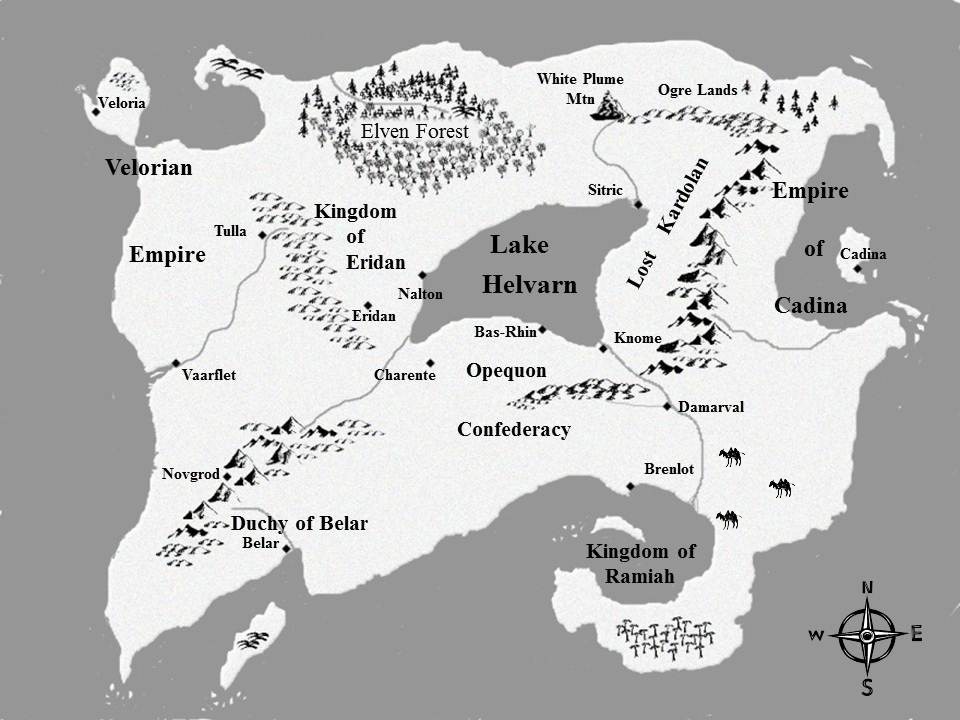
What do you think? By clicking on the map, you should be able to view a larger image and even zoom in if you’d like. (I recently (March 2016) discovered another tool for Mapmakers. It’s called Inkarnate and I blogged about it in map making revisited. Maps in the published versions of my books were made using Inkarnate.)
As always thanks for reading
Armen
For those interested in the process I followed (using GIMP), here are the details and a few links I found useful.
It took me several days of searching the internet, watching a few videos, and a half-dozen or so aborted attempts before I found a simple methodology that worked for me. The most important things I learned are to use the layer feature and to save my work very often so that I could easily recover from my frequent mistakes. Basically, if you make a mistake or don’t like the way something looks you can back up. Unlike Word, you can’t back out of individual actions, and instead return to your last saved version, which can wipe out features you liked as well as those you didn’t.
1. Create a layer and fill it in with whatever color you want your water to be. I chose a bluish-green
2. Create a second layer on top of that one in whatever color you want your background land to be. I went with a light brown – for a parchment look, which of course was mostly lost with the rest of my colors, but you get the idea.
3. Use the ‘erase’ paint function to remove the land layer and reveal the ocean and lakes beneath. Leave land where you want to create islands. Frequent saving is very helpful during this step. I outlined my continent and islands using a large circular paint brush. For the finer details along the coast and creating smaller islands, I zoomed in with a smaller brush. Finally, I used an irregularly shaped brush (one of my trees actually) to get some rough edges along the coasts.
4. I created a transparent layer (to keep the water and land visible) for my terrain features. Using mountains and hills I’d downloaded from free-use sites along with a few I’d made myself, I created the mountain ranges and hilly areas. GIMP allows you to change the size and color intensity of the paint brushes. I used this capability to vary the mountains and make foothills.
5. With the mountains in place I used a small circular brush and the erase function to carve out the rivers. I set the brush even smaller and carved out the river deltas and any minor tributaries. I spent a lot of time on the islands and lagoon for the city of Sitric, which I’m not sure show up well in the final version. The lesson here is that while it’s great to zoom in, always remember to look at something while zoomed out. Many fine details vanish and things that look like mistakes up close are really okay at normal magnification.
6. I added another transparent layer and placed the trees, again varying the sizes and shapes to make the forest and jungle look more realistic. I think I used two different evergreen trees and three or four deciduous trees, including a leafless one. The jungle consists of two different trees varied in size and color. I also added camels for a desert area – my kids insist they look like dogs.
7. Finally I wanted to add text. I had difficulty getting the look I wanted with the text tools in GIMP. So I saved the file as a jpeg and imported it into Powerpoint where I added all of the map’s labels. This was also a bit of a trial and error process, playing with fonts, sizes, and rotations. I’m particularly pleased with the way the text looks in the Elven Forest. I finished by saving the image as a jpeg file at 300 DPI.
Additional Information & Tutorials
Video Tutorial on Making GIMP Brushes:
http://www.youtube.com/watch?v=WhFxvLa4C34
Map Tutorials from The Cartographers’ Guild: CG Tutorials
As an aside please consider signing up for my FREE author newsletter. It will contain opportunities to preview new books, announcements, and contests related to my novels. It will not overwhelm your inbox – I’m thinking once a month or less depending on news.
If you have subscribed, but haven’t received a newsletter, please check your spam folder. Moving the newsletter to your inbox should fix the issue.
Pretty! This was an extremely wonderful article.
Thanks for providing these details.
Armen, So cool! I’ll revisit your instructions when I’m ready to create my map for book 2 of my fantasy series, which will be soon!
Beth, thanks! My steps are pretty high level, but if you follow some of the links, you’ll see the details I left out. For me it was definitely a trial and error process. Best of luck to you!
That is dad burned amazing. I am going to put a map on my most recent fantasy. Thank you so much for such a detailed piece of information.
Dee Carey
http://www.careyfoxlady.com
Dee, I’m so glad that you found it helpful and best of luck to you with your own map. I’m certainly no expert, so if I can do it I’m sure you can, too!
Armen
Fascinating! Good luck on the marketing end of this new book.
This is pretty cool. It might come in handy for me with creating maps for my books.
Thanks for you comment, David. Maps are a lot of fun, but can be daunting for some. There are programs you can buy for ~$50, but I wanted to see what I could do for no cost – other than my time. It may not be the greatest, but I’m not embarrassed to include it with my books. As for my process, hopefully it’s helpful – even if only as an example of what you don’t want to do.
This is so great, Armen! Thanks for sharing your steps. Though not a fantasy author, I make maps of the areas in my stories. I’ve not done one in a computer program, I draw & color them by hand. With your easy to follow steps, I may just attempt my next map in GIMP.
Nadia, if you do, make sure you check out some of the links I included. They’ll help you fill-in the details I had to leave out of my steps to make them readable.
What a great idea. Thanks for sharing your process, Armen!
Rita, thanks for reading! I’m sure there are better ways to make a map, but this is the process that worked for me.